Initial remarks
The notes and the clips below were originally created in the spring of
2021, and although the 2021 State of Haskell Survey didn't totally
upend the survey of 2020 (which the recommendations below are based
on), it should be noted that the use of ghcup and bare-bone cabal
has increased quite a lot in just a year, and that the stack
toolchain which is discussed below is no longer as dominant as it used
to be.
I still think stack will be the most pragmatic alternative for your
coursework, but you should be aware that there is an increasing number
of Haskell developers who are using ghcup and cabal directly.
Also observe that the version numbers in Stackage have been updated
since the text and clips below – at the beginning of the
EDAN40/EDAF95 class of 2022, LTS-19.0 is the new LTS-17.7.
How to set up a Haskell tool chain for EDAN40/EDAF95
To run Haskell in EDAN40/EDAF95, you need a couple of things:
- A good text editor
- A tool for building your programs, and for managing your dependencies
- Somewhere to get curated libraries
- Libraries for testing
There are several alternatives for each of these items, but I'm going to recommend that you listen to what experienced Haskell developers have said in the 2020 State of Haskell Survey
Editor
Haskell source code is pure text, so of course we can use any text editor, but among Haskellers, there is a pretty clear trend toward Visual Studio Code (being someone who spend most of my days in Emacs, it feels somewhat odd to recommend VS Code, but I can see why Haskellers flock to it).
There are at least two compelling arguments for using VS Code in this course:
- Its Haskell support is based on LSP, which enables many powerful features, such as linting, auto-complete, go to documentation, etc. (linting is especially useful when you learn a new language).
- It has Live Share, which allows you to pair program at a COVID-safe distance.
You can install VS Code, either from their web site, or using your
package manager (there are versions for Windows and macOS, and .deb
and .rpm packages for Linux – I run Manjaro/Arch Linux, and use
pacman -S code).
Build tool
As software gets increasingly complex, we've come to depend on more
and more libraries to build anything interesting in any language. It
is therefore crucial to have a good dependence manager and build
system – for Rust we have cargo, for Python we have poetry and
pip, for Java we have gradle, for Scala we have sbt, for Clojure
we have lein, etc.
This used to be a weak point of the Haskell ecosystem, but it has
improved greatly over the years. Some years ago, the only available
Haskell build system was cabal, and although it is great in many
ways, it had serious problems dealing with different versions of
packages (if you google "cabal dependency", the auto-completion will
probably suggest the word "hell" pretty high up in the list). This is
why stack was developed – it is based on cabal, but it takes the
idea of 'reproducible builds' very seriously, and maintains a list of
curated packages available for download (see stackage.org below).
Handling of dependencies has improved vastly in recent versions of
cabal, but a look at the results of 2020 State of Haskell survey
suggests that you should consider using stack for your own projects.
EDIT: Over the last year, ghcup and cabal have gained a lot in
popularity, as can be seen in the 2021 State of Haskell Survey – I
assume many of those using it are people who run Haskell on a daily
basis though, for someone who isn't, I'd still recommend using
stack.
The one thing to watch out for is that your ~/.stack directory can
become very big if you use many different snapshots. If it becomes too
big, you can remove the whole directory (maybe after saving some
settings) and just rebuild the stack projects you're working on –
stack will then reload the files you actually need.
Below, we'll see how to create a stack project.
Package repository
There are some package repositories available, but if we're going to
use stack, we should also use stackage.org (see the results of
2020 State of Haskell survey).
Stackage contains a long list of curated releases (also called snapshots) – each release contains specific versions of the libraries, and these versions of the libraries have been tested together, so they should work well together. Some of the releases are Long-Term-Support releases (LTS), and they'll be supported for several years (LTS 0.7 was published 6 years ago, and is still maintained).
To avoid downloading many versions of libraries, you could pick one
LTS release for the course, and stick with it (new LTS releases are
churned out almost every week, but in mid March of 2021, lts-17.7
seems to be a good choice).
In the search bar of stackage, you can search for functions, libraries, and even function signatures (unfortunately, because of space constraints, when you search for a package, stackage will sometimes show you the results for the latest LTS, even if you searched for another LTS, but that will most likely not make any difference during this course).
Creating a stack project
There is a good documentation site for stack, where you can find all
information you need – below are just a few comments.
To create a new "hello-world" project, we do (the $ is not part of
the command):
$ stack new hello
stack will then create the following files for us (in a new
directory):
hello
├── app
│  └── Main.hs
├── ChangeLog.md
├── hello.cabal
├── LICENSE
├── package.yaml
├── README.md
├── Setup.hs
├── src
│  └── Lib.hs
├── stack.yaml
└── test
   └── Spec.hs
Some things we need to know here:
The source code has been split up into three directories:
appcontains the main program, and isn't supposed to contain much moresrccontains one or more modules with the code we want to use from our main programtestcontains our tests
This way of organizing our code makes it much easier to write tests, so I recommend that you use it.
The file
stack.yamlcontains information about which 'stackage snapshot' we want to use (i.e., which version of the curated libraries) – to uselts-17.7we can set it as:resolver: lts-17.7New LTS releases are published almost weekly, but, as said above, I think you should probably stick with one release for the whole course (to stop your
~/.stackdirectory from growing too big).Once we've set the
resolver, we can set up our project with:$ stack setup
This creates a directory
.stack-work, where the output of variousstackcommands will be put (normally we want to avoid tracking generated files, so we put.stack-workin.gitignore, andstack newhas already done that for us).- The file
package.yamlcontains a description of our dependencies, we'll look at it in the section about testing below. - The file
hello.cabalis generated frompackage.yaml, we should not change it.
You can customize some 'global' settings in your
~/.stack/config.yaml file (these settings will be used for all stack
projects you create with stack new):
templates: params: author-name: <your name> author-email: <your email> copyright: <whatever you prefer> github-username: <your github username>
These values will be put into some of the generated files (LICENSE,
and package.yaml, which in turn will generate a <package>.cabal
file).
By the way: stack can create different kinds of projects using
templates, we may return to that later in the course (in case we set
up templates for the projects).
There are a couple of stack commands we can use when we write our
programs:
stack new: creates a project (see above)stack setup: sets up the project to use the right snapshotstack build: compiles the project, and puts the executable file deep down in the.stack-worksubdirectorystack exec: allows us to run the executable (which we have build usingstack build)stack test: runs the tests in our test directory (see separate section below)stack repl: starts a REPL (Read Evaluate Print Loop) with all the imports in the projects loaded – it allows us to see the types of expressions, and to evaluate expressions, it can be a nice tool to try things out
In the clip below, I use stack to write a simple toy program which
parses the command line arguments, and prints the ones which are
integers, in ascending order. So, we want the following behavior:
$ ./show-integers 32 five-is-not-a-number 12 to be 24 or not 16 to be
[12,16,24,32]
To read the command line arguments, we can use the function getArgs,
you can look it up on stackage.org (enter getArgs in the search
bar). If you watch the clip, I suggest that you pause and try things
out yourself along the way.
You can download the final version of the code I wrote here (after you
unpack it, you should be able to run stack build, stack exec, and
stack test).
I apologize for all the dry coughing in the clip (it seems the ventilation system in the E-building wasn't tuned to the very low load during the COVID pandemic).
Exercises
- The 'final' version of the program above has some logic inside
main, move some of that logic to a new function inLib(it will make it much easier to test the program – we'll look into it in the next section). - There is an error in the program above, or at least an ambiguity in the problem statement – can you see it? (We'll return to it below)
A few words about testing
There is a saying by Sir Tony Hoare, the inventor of, among many other great things, quicksort and quickselect:
There are two ways of constructing a piece of software:
One is to make it so simple that there are obviously no errors,
and the other is to make it so complicated that there are no obvious errors.
(Hoare is also, untypically, the inventor of NULL, but he has called
it his "billion-dollar mistake".)
Haskell helps us making some programs so simple that there are almost certainly no errors, but to be safe, we should always test our programs.
There are a couple of reasons for why every serious developer test her programs:
- It gives us at least some confidence that our code is correct – as will be seen in the clip below, we should be careful not to be complacent, though, just having test will not help us if we don't come up with tests for the difficult cases.
- Writing tests can help up iron out difficulties – when we look for relevant things to test, we often get a much better grasp of the problem we're trying to solve.
- It can also help us finding ambiguities – if we write tests for the
isIntfunction above, the problem of negative numbers will arise almost immediately (in this case, my intention was not to deal with negative numbers, so the solution would be to rephrase the problem statement, but we could also have rewritten our code to handle more cases – in either case we will end up with a problem statement which is more precise). - Writing tests can also help us design our code – when we write our tests, we have to use the API we're creating (this is a version of dogfooding), and if we do this upfront, it can help us design an API which is nice to use (this effect can also be achieved if we use top-down design).
So, we should make sure we have tests which covers most, if not all of our code – 'real' projects often have huge test suites, which takes many hours or sometimes even days to run. But we shouldn't test indiscriminately, only use tests which add something which hasn't already been tested.
There are a several good libraries for testing in Haskell, this is the results of the 2020 State of Haskell survey when it comes to testing:
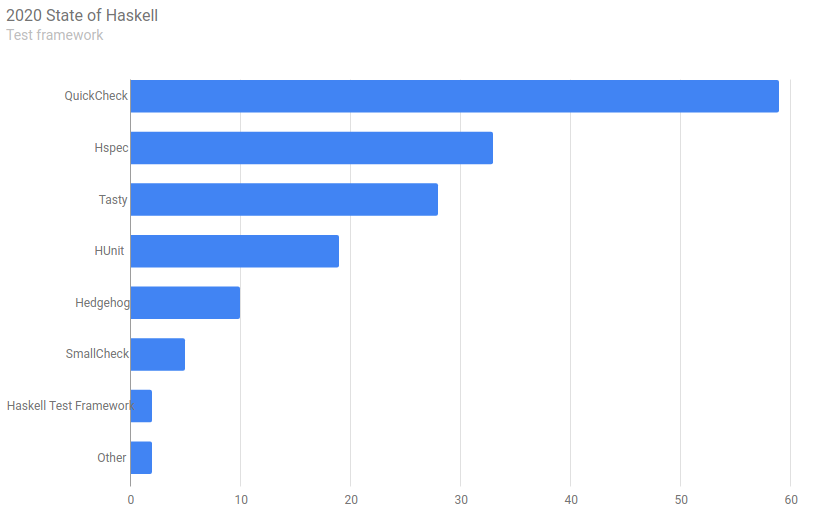
Figure 1: Test framework
HUnitis a Haskell version of JUnit, we write code which checks that our functions return the expected results for given test data.QuickCheckis a very clever tool for testing functions – instead of defining input and checking output (as we do forHUnit), we define properties which the return values of our function should have, and then ask the library to come up with counterexamples.HSpecis a kind of DSL which allows us to write testable specifications for our functions (except for the syntax, it's pretty similar toHUnit).Tastyis a libraray which builds on top of the libraries above (and some others) – it makes it easy to combine different kinds of tests into one test program.
Tasty, HUnit and QuickCheck are not included in the standard library
(Prelude), so we need to tell stack where to find them. We do that
by adding the following lines to package.yaml (see the last three
lines – observe that we put them under tests, not under
executables, since they only will be used in our tests, not in our
main program or library):
tests:
  hello-test:
    main:                Spec.hs
    source-dirs:         test
    ghc-options:
    - -threaded
    - -rtsopts
    - -with-rtsopts=-N
    dependencies:
      - hello
      - tasty
      - tasty-hunit
      - tasty-quickcheck
We can find the names of the libraries by doing a search on the
stackage.org site.
The tests goes into the tests directory, in the file Spec.hs (the
directory and file names can be configured in the package.yaml
file).
Using tasty, we can group the tests in "test trees", which makes it
easy to organize them. The tests are then run from the main function
using the defaultMain function, which takes a test tree as a
parameter. Observe that this main function is not the regular
'executable' of the project (that main resides in the app
directory), it is the main which is run when we test our code (and
it will normally not be included when we deploy our code).
To write a couple of unit tests using Tasty.HUnit (very similar to
unit tests i Java), we can put the following code in Spec.hs:
import Test.Tasty
import Test.Tasty.HUnit

unitTests = testGroup "Unit tests"
  [
    testCase "isInt \"nan\"" $ isInt "nan" @?= False,
    testCase "isInt \"42\"" $ isInt "42" @?= True
  ]

main = defaultMain unitTests
For an explanation of the syntax, see the docs. BTW: if we want to
reuse isInt in other contexts than the program we wrote above, we
should also check if it handles an empty string properly, and of
course, check if it handles negative integers, or real numbers, etc.
We then run the tests with:
$ stack test
For unit tests, we have to come up with all test cases ourselves –
but there is a very interesting alternative, known as property
testing, and the most used library for property testing is
QuickCheck.
To write a property test, we define properties we want the return values of our functions to have – for a sorting function, that could be things such as:
- Idempotence: if we sort 'twice', i.e., if we sort a sorted list, we should get the same value back.
- Same length: The number of elements in a sorted list should be the same as the number of elements of the list itself
- In order: The elements in the sorted list should be in ascending order.
We can write functions which takes a list of, say, integers, and make
sure that these properties hold after we've sorted them. We can then
ask QuickCheck to try to come up with counterexamples – so we don't
define any test data, QuickCheck does it by itself, and if it finds
any test data for which our properties doesn't hold, it will try to
simplify them into the simplest case it can find.
import Test.Tasty
import Test.Tasty.QuickCheck

propIdempotence :: [Int] -> Bool
propIdempotence list = sort list == sort (sort list)

propertyTests = testGroup "Property tests"
  [
    testProperty "Idempotence" $ propIdempotence
  ]

main = defaultMain propertyTests
Since QuickCheck itself should come up with test data, we need to
help it with the types, that's why we defined the parameter to
propIdempotence as an [Int], not a Ord a => [a] – you can read
more about it in the docs.
To combine the unit tests and property tests above, we can create a new test tree, and use it from main:
import Test.Tasty
import Test.Tasty.HUnit
import Test.Tasty.QuickCheck

unitTests = testGroup "Unit tests"
  [
    testCase "isInt \"nan\"" $ isInt "nan" @?= False,
    testCase "isInt \"42\"" $ isInt "42" @?= True
  ]

propIdempotence :: [Int] -> Bool
propIdempotence list = sort list == sort (sort list)

propertyTests = testGroup "Property tests"
  [
    testProperty "Idempotence" $ propIdempotence
  ]

allTests = testGroup "All tests" [ unitTests, propertyTests ]

main = defaultMain allTests
In the clip below, we'll add some unit tests and property tests to the toy program we wrote above:
Exercises
- Add tests for
isIntandtoInt. - Add tests for the function which handles the logic of the main program.